post

Easy No-Knead Artisan Bread

Easy No-Knead Artisan Bread

No Knead artisan bread

Believe it or not, this is actually one my favorite recipes that I have up here.  There’s just something about homemade bread that I’ve always loved.  Nothing beats cutting into a loaf that you made with your own two hands.  No matter what, it is always going to taste better than anything you could ever buy.

No knead artisan bread

Now, there are tons of recipes for no-knead bread floating around the internet but I wanted to share it here as well.  There are a few small things that this recipe has that truly make it amazing.  I guarantee you that when you try this, you are going to be shocked at how simple it was too make and how incredibly good the results turned out to be.  There really isn’t much you could do to screw this recipe up.

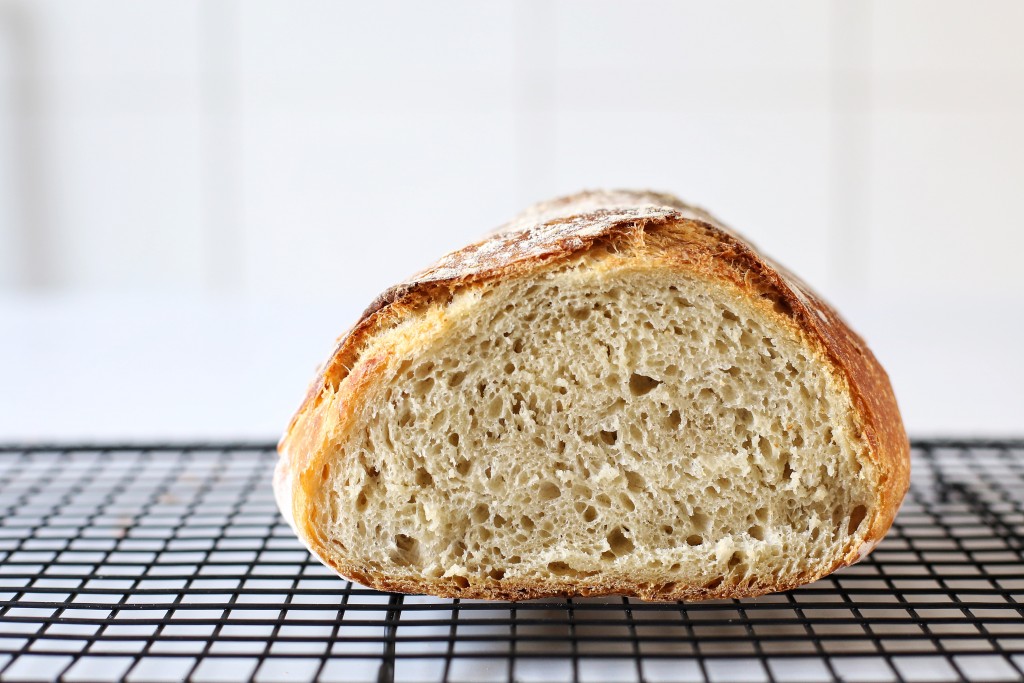
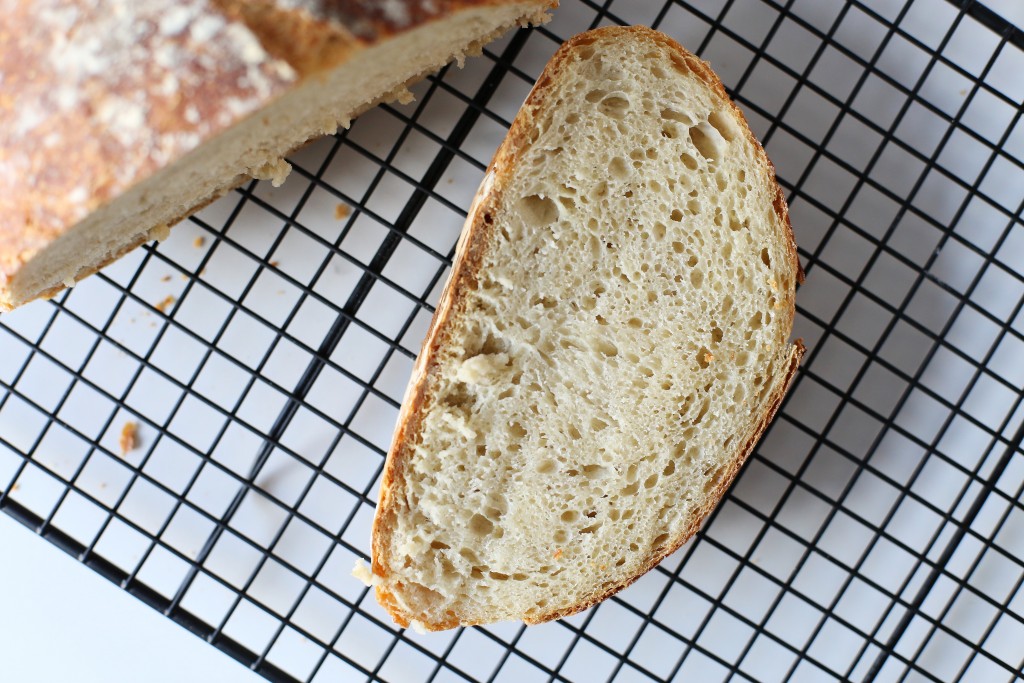
Despite it being super easy to make, this recipe does require a bit of time.  Part of what makes this bread so good is the long rise time that the dough gets.  As opposed to a typical bread recipe that is kneaded, no-knead bread requires a relatively long time to ferment in order to build up the glutens that give the bread its great texture.

No knead artisan bread

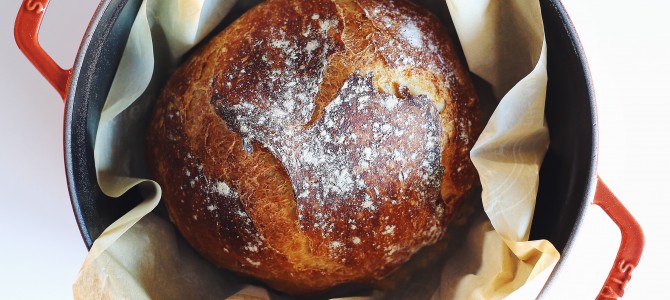
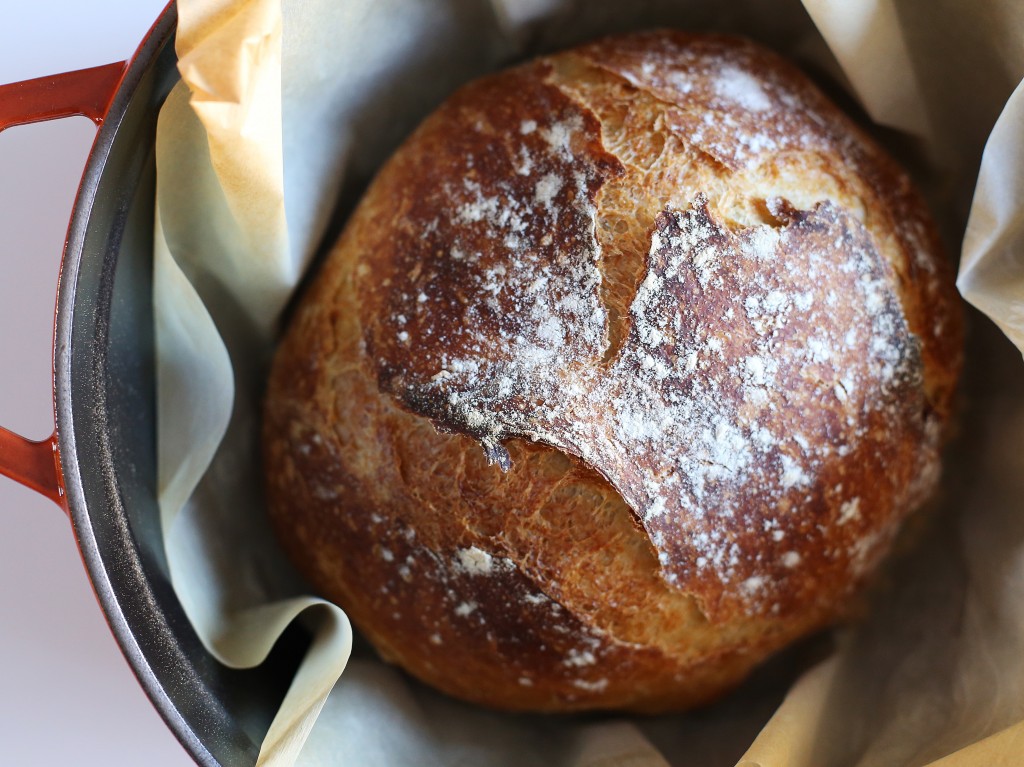
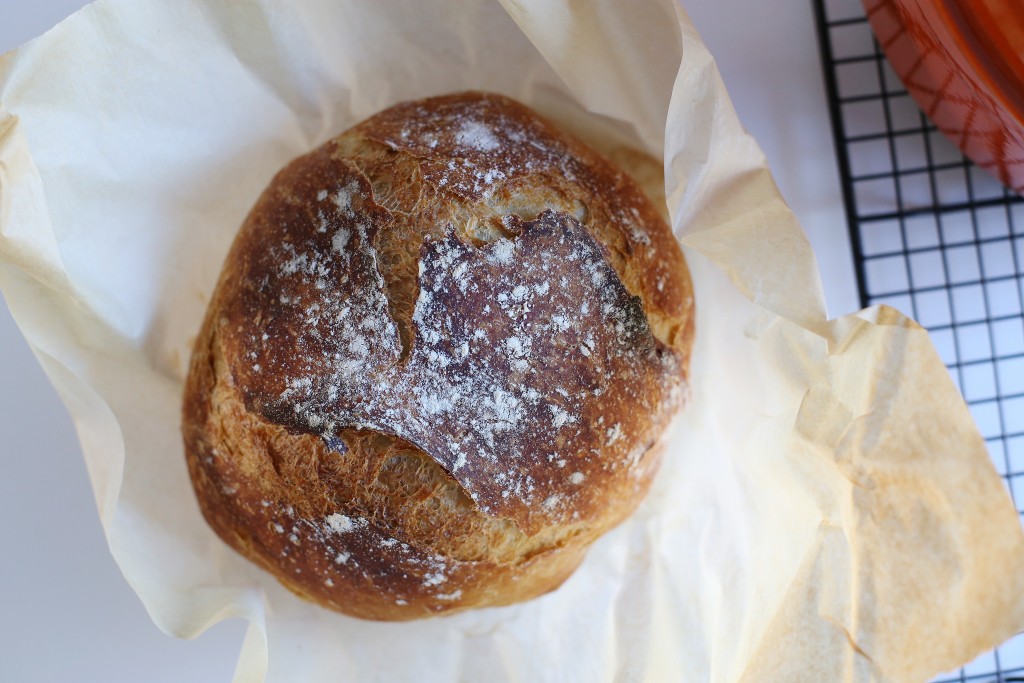
I don’t really consider the long rise a drawback, it’s just something that you need to take into account and plan for.  I like to let the dough rise for 16-18 hours so you’re going to want to prep it the night before you plan to bake it.    Another thing to keep in mind is that you’ll need a large oven safe cocotte or dutch-oven.  Cast iron is going to work best since it really locks in the heat but I think any sort of vessel would work.  Cooking in the cocotte creates the steam necessary to get a super crisp and rustic crust.

No knead bread dough

The first time I made this bread, I actually made it another two times in the same weekend.  That’s three loaves in one weekend.. I think I may have a problem.  I think its best hot and fresh out of the oven but another great use for it is to let it go a bit stale, then grill it with olive oil and rub with garlic.  You really could use it for anything though and it will elevate whatever you use it for, whether it be grilled cheese, croutons, any sandwich or for dipping into soup.   My favorite way to eat it is  on its own and maybe with some runny eggs for dipping.

no knead bread

Again, please don’t be intimated by the long rising time. This recipe really couldn’t be easier. Unlike many other types of baking, this recipe is really forgiving.  You don’t need to worry about super precise measurements at all.  I’ve had a bit of inconsistencies in the dough due to laziness or because I was rushing and the bread has turned out perfect every time.  It’s one of those things that you just need to get a feel for.

I hope you enjoy this recipe as much as I do.

Easy No-Knead Artisan Bread

Makes 1 Loaf

INGREDIENTS

  • 3 cups bread flour, plus extra for dusting
  • 1 teaspoon active dry yeast
  • 1 1/2 teaspoons salt
  • warm water (about 110°F)

METHOD

In a large mixing bowl, whisk together the flour, yeast, and salt.  Pour in about 1 1/2 cups warm water and stir everything together with a wooden spoon or spatula until the dough comes together.  If necessary add more water 1/2 tablespoon at a time until a dough forms.  At this point the dough will look rough and sticky.  Cover the bowl with plastic wrap and allow to rise for 12-18 hours, ideally closer to 18.

When ready to bake, place your cocotte or dutch oven into your oven preheated to 450°F and allow it to get really hot for at least 30 minutes.

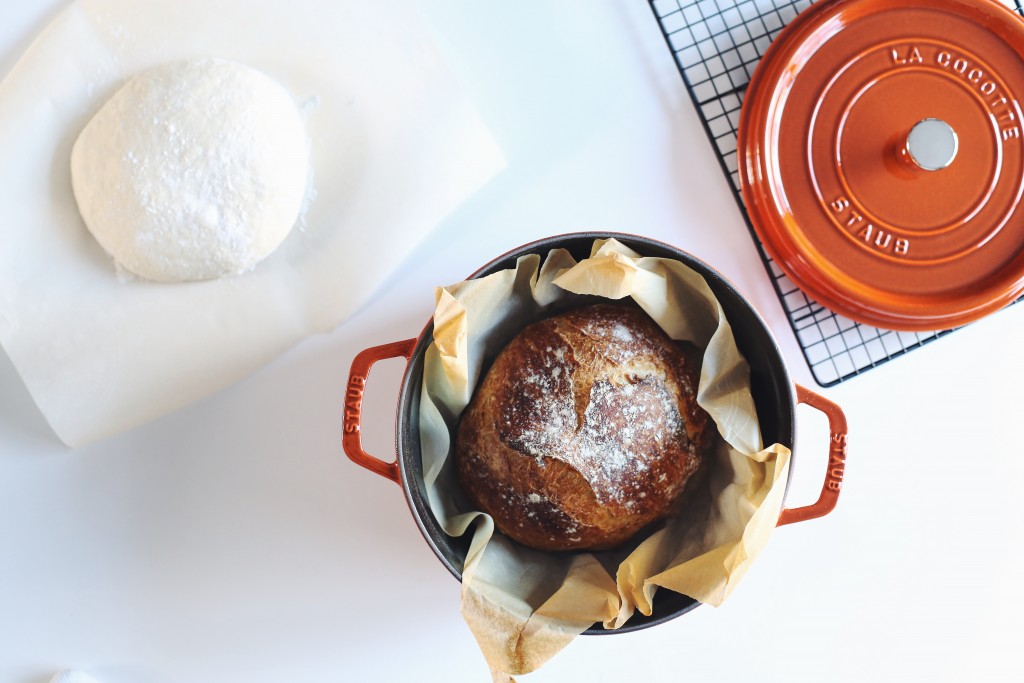
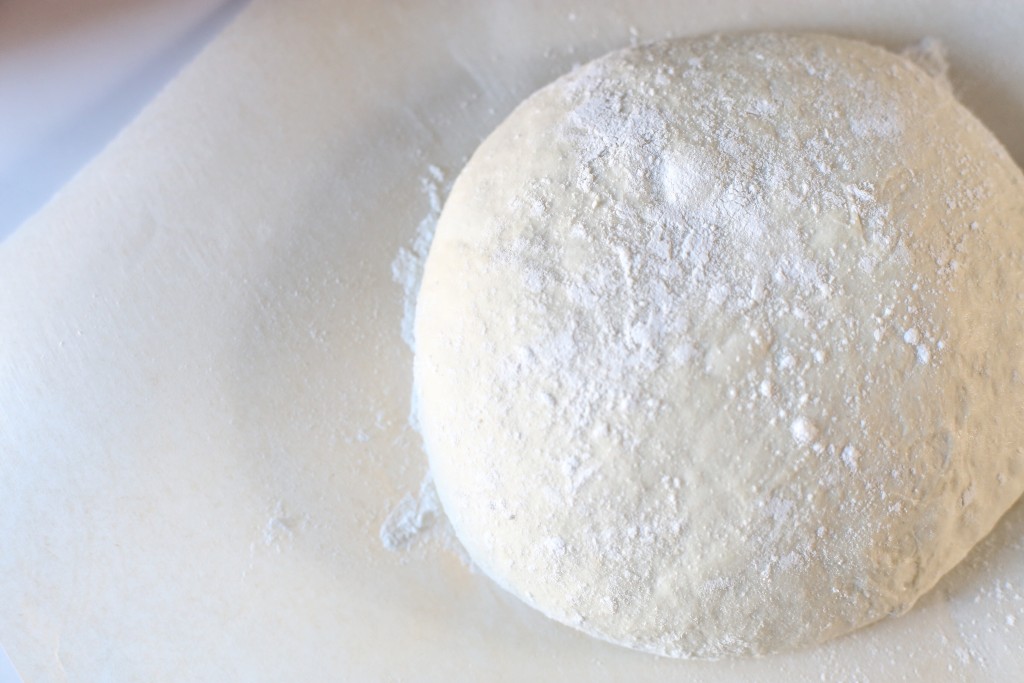
While the dutch oven is preheating, flour your hands very well, and dump the dough onto a piece of parchment paper.  Form it into a ball tucking the edges underneath and then lightly dust with flour and cover with a piece of plastic wrap.  Allow it to rise for another 30 minutes to an hour while the dutch oven is preheating.

After it’s preheated, using oven mitts, carefully remove the dutch oven and transfer the dough into the pot.  I recommend transferring it with the parchment paper.  It’s cleaner and makes for easier transferring.  Just pick up the corners of the paper and carefully drop it in.  Return lid to dutch oven and place it back in the oven.

Allow it to bake for 45 minutes with the lid on, and then carefully remove the lid and bake for another 15 minutes until perfectly browed and crisp

Finally, remove the bread from the dutch oven and allow it to slightly cool before cutting into it and enjoying.


post

Spicy Miso Pho Ga

Pho Ga

A good bowl of Pho is one of my favourite things to get for take-out. It’s one of those take-out items that is just as good at home as it is in the restaurant.  Since the broth is packed separate from the noodles and all the toppings, everything stays nice and fresh.

Now, I know this recipe is far from an authentic Pho Ga.  I’m definitely not claiming that it is traditional or anything similar to what you might get in a Vietnamese restaurant. But this is my own version and it’s inspired by my favourite take out spot.

pho ga

There are a few things that make this recipe so delicious.  The star of the show is really the broth.  Without a good broth, you’re not going to end up with an enjoyable soup.  The second is all the toppings.  I love all the fresh and bright toppings, they really make the soup.  I like to prep a big plate of all the toppings and serve it alongside the soup so you can keep adding more as you go.

The broth for this was adapted from a friend of mine’s blog.  You can check out the original right here, on Christine’s blog, What Do You Crave.  The only reason I even made changes were out of convenience and because of what I happened to have on hand.  I didn’t have leek so I used green onion instead.  I also had some cloves so I through those in the broth as well.  The only other change I made was grilling the vegetables on the BBQ before adding them to the pot whereas Christine baked them in the oven.

I was really impressed with how flavorful the broth came to be in such a relatively short time.  It may seem like kind of pain to make your own broth from scratch but it really is pretty effortless, and is so much better than any result you’ll get using a boxed chicken stock.  I made the broth a day in advance.  This really broke up the process for me and made it feel even simpler.  It’s also easier to skim off excess fat after the broth has chilled in the fridge for a bit.

pho ga toppings

Another cool thing I did was serve the broth out of my new tea kettle.  It was a fun way to serve everything at the table. To serve everything up, make a big plate of all your toppings.  You don’t have to use exactly the same things I used.  You can add in whatever you want.   Once you’re toppings are all set up, add your noodles to the bowl and then pour in the broth.  Top the soup to your liking and you’re good to go.

Spicy Miso Pho Ga

Makes 4 bowls

Ingredients

For the broth

  • 1 whole chicken, 4-5 lbs
  • 1 large yellow onion
  • small bunch of green onion
  • 2 stalks lemongrass
  • 1 dried thai chili (can sub in a big pinch of chili flakes)
  • 1 thumb sized piece of ginger, peeled
  • 2 star anise pods
  • 4 whole cloves
  • 1 tbsp sea salt
  • 2 tbsp sugar
  • 2 tbsp miso paste
  • 16 oz rice noodles

Optional Toppings 

  • Thinly sliced red onion
  • Cilantro, torn
  • Radishes, thinly sliced
  • Green onion, thinly sliced
  • Wasabi micro greens
  • lime wedges
  • Shredded chicken
  • soft boiled egg

Method

To make the broth, char the onion, green onion, and ginger on a grill (or under broiler).  Don’t worry about removing the skin from the onion, it will easily come off once its charred.  You want to let everything cook until it’s softened and nicely colored.  The green onions will go quick but the yellow onion and ginger can stay on for about 15 minutes or so.  Remove from grill, and then add to a large stock pot with the chicken.  Be sure to remove any of the remaining charred skin off the onion.  Bruise the lemongrass with the side off a knife and then put that in as well .  Add the cloves, star anise, chili, sugar and salt, and then cover with with about 12 cups of cold water.

Bring it to a boil skimming off the fat as it accumulates on top.  Reduce the heat to a simmer and allow it to cook for about 45 minutes or until the chicken is fully cooked.

At this point, carefully remove the chicken and shred the meat off the bone. Set the shredded meat aside for now.

If you can, try to cut the chicken carcass into several pieces, this will help extract additional flavour for the broth.  Put all the remaining bones back into the broth for another 1-2 hours with the pot partially covered.  1 hour will be fine but you can let it go for an additional hour or so.

After 1-2 hours. Remove the chicken bones and then stir in the miso paste to dissolve.

Remove and discard all the remaining vegetables and then put the soup through a fine mesh strainer.  There will still be fat on top that needs to be skimmed off.  At this point you can either begin to prep your toppings, or chill the broth and save it for the next day.

To get ready for serving, cook noodles according package directions and then rinse under cold water.

If you are serving with soft boiled eggs, cook them for 6 and a half minutes and then peel them carefully under running water.

Get all your other toppings ready and place them together on a plate.

Build your bowls by adding noodles and then pouring over the hot broth.  Top as desired and enjoy