post

Avocado Toast with Chipotle Mayo & Toasted Coriander

Avocado Toast with Chipotle Mayo & Toasted Coriander

I know what you’re thinking.  Why do I need a recipe for avocado toast, it’s just mashed avocado and bread, right?  Wrong. Well, kind of.  Sure,  you could just throw some avocado on a piece of white bread and call it a day and it would be pretty good.  But when you’re feeling something a bit more elevated, this avocado toast recipe is perfect.

Avocado Toast

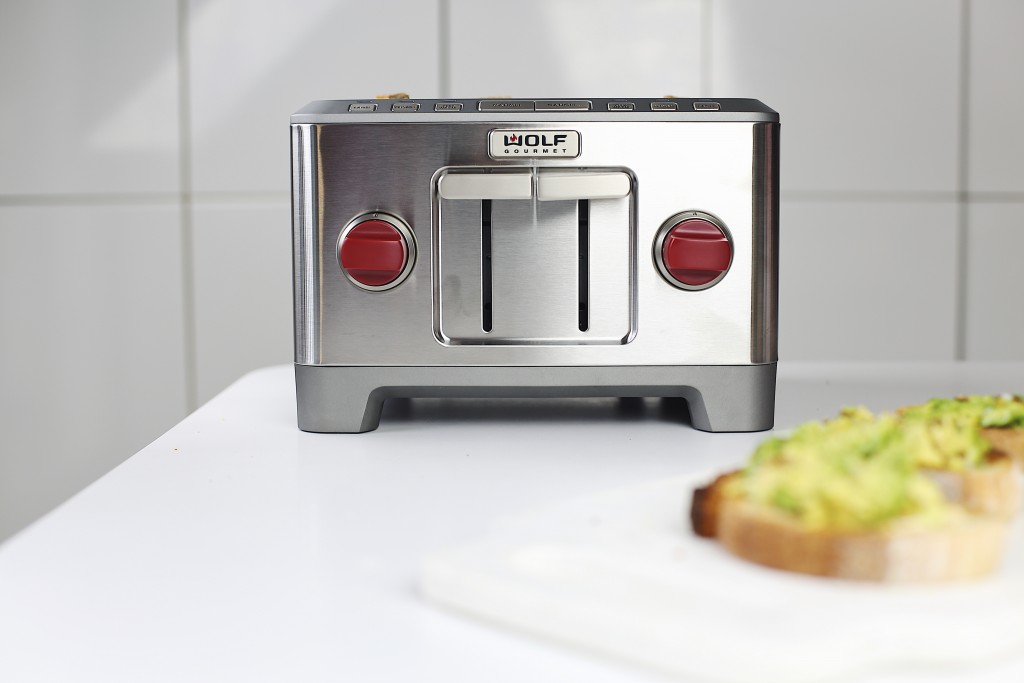
For this recipe I’ve teamed up with Wolf Gourmet to highlight their 4-slice toaster.  For years, I’ve been using a toaster oven at home and every time I use it, I remember how much I hate it.  It takes forever to toast bread and doesn’t even do a particularly good job.  So I was pretty excited to finally have a reason to make the switch to a pop up toaster and the Wolf Gourmet 4-slice didn’t disappoint.  After using the Wolf Gourmet 4-slice toaster for this recipe, I’m totally sold on it and will definitely not be going back to the toaster over.  It was quick, gave me perfectly even browning, and it’s also pretty easy on the eyes.  What else could you ask for in a toaster really? You can purchase the toaster at Williams-Sonoma.

Wolf Toaster

Alright, on to the avocado toast.  First let me say that if you think avocado toast is just avocado toast, you haven’t experienced enough of it.  Like I said earlier, there is nothing wrong with a basic avocado toast.  But for when you need something a little extra, this is the avocado toast for you.

bread knife

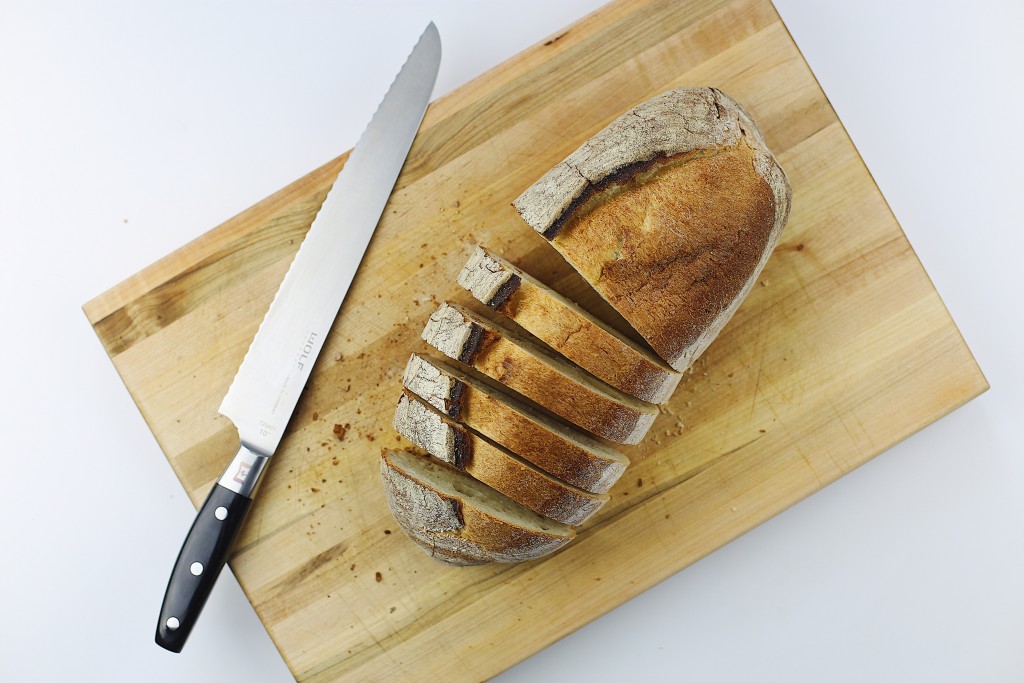
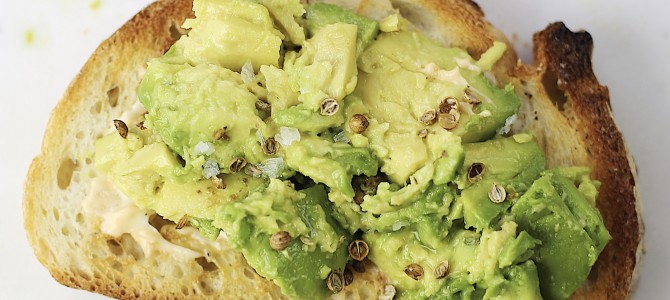
A few things set this apart.  The first thing is the bread.  You want a crusty bread.  It doesn’t really matter but something with a bit of a chew.  French bread, baguette, or sourdough would work perfect.  You want to toast it until golden brown.  I used level 6 on this toaster.  The next thing that sets this apart is a bit of garlic.  When the bread comes out of the toaster, you want to rub each piece with a clove of garlic.  It’s an easy thing to do, but it really makes a difference. Chipotle mayo is what takes this avocado toast to the next level.  Avocado is already creamy on its own so the addition of chipotle mayo is really a luxurious addition.

Avocado toast

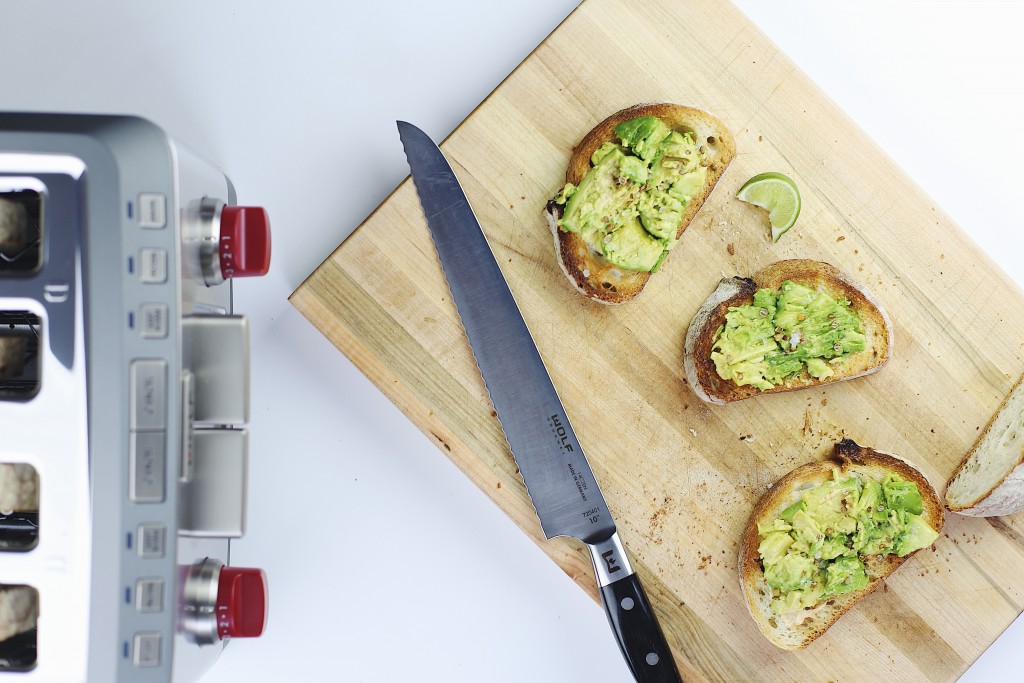
The last unique thing about this is the toasted coriander.  I love the flavor of coriander seed, especially when it’s toasted.  I find that it meshes perfect with the avocado, chipotle, and lime in this case.  When it comes to the actual smashing of the avocado, there are a few routes you can take.  You can mash it all up in a bowl and then spread it on the bread.  But I find that’s a bit more like guac.  The avocados I had for this recipe were so perfect I didn’t want to completely smash them.  Instead, I cubed them and then gave them a light press with a fork in order to get a bit more texture out of the avocados.  That’s really just a preference though.  You could smash the avocado, more, less, or not at all depending on your mood.
Avocado Toast

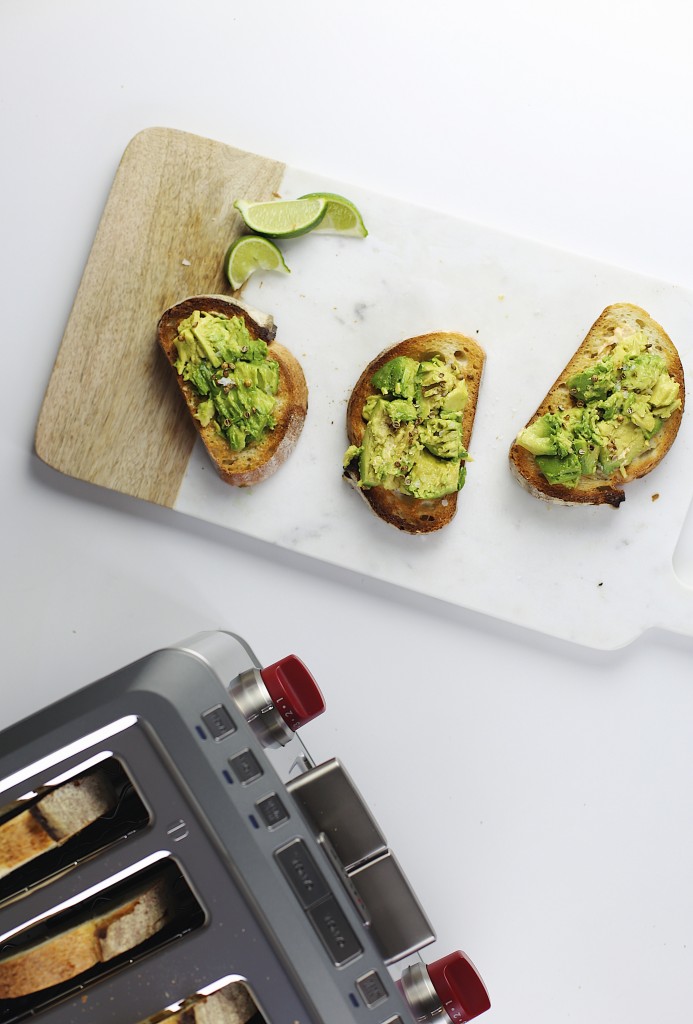
If you’re wondering why there are only 3 toasts in the pictures, it’s because I couldn’t resist and ate one before I could take pictures.

Now for the recipe.

Avocado Toast with Chipotle Mayo & Toasted Coriander

Ingredients

  • 2 ripe avocados
  • 4 slices of crusty bread
  • 4 tbsp chipotle mayo
  • 1 tbsp coriander seeds
  • 1 clove of garlic
  • 1 lime, cut into wedges
  • 4 pinches of maldon sea salt or other finishing salt

Method

Toast your bread until perfectly golden brown and then rub each piece with the clove of garlic.  While the bread is toasting, halve the avocados and carefully remove the pits using a sharp knife.  Score the avocado halves in a cross-hatch pattern and then using a spoon, slide between the flesh and skin to get out the cubes.

Toast the coriander seed in a dry pan over medium heat until fragrant moving them around every 30 seconds or so.  Allow them to slightly cool, then crush using the bottom of a heavy pan or pestle and mortar. Set aside for now.

Spread about 1 tbsp of chipotle mayo on each piece of toast leaving a bit of the bread exposed around the edges.  Top each piece of toast with 1/2 an avocado (cubed) and then lightly press them down using a fork.  Sprinkle the coriander amongst the toast and then add a pinch of salt to each toast as well.  Serve with lime for squeezing.

post

Jalapeño-Cheddar Buttermilk Biscuits

Jalapeño-Cheddar Buttermilk Biscuits 

These biscuits are the real deal.  Every time I make them, they somehow get better and better.  I love to use them for breakfast sandwiches and fried chicken sandwiches but they are also great on their own.  They’re so easy to make as well.  You don’t need a mixer or any special tools and you can have them ready in about 20 minutes from start to finish.  Doesn’t get much better than that.

Jalapeño Cheddar Buttermilk Biscuit

These biscuits are light and buttery on the inside with a slightly crisp golden brown exterior.  I like the addition of jalapeño and cheddar but you can definitely skip them and keep the rest of the recipe the same if you want them plain.  Feel free to add more also if you want.  They come out relatively mild but have a subtle kick from the jalapeños and a nice cheesiness from the cheddar.

 Biscuit stack


These will seriously step up your brunch game.  Gotta risk it for the biscuit, right?

Jalapeño-Cheddar Buttermilk Biscuits 

Ingredients

  • 2 cups all purpose flour
  • 1 cup buttermilk
  • 6 tablespoons butter, cold
  • 1 tablespoon baking powder
  • 1 tsp salt
  • 1/4 tsp baking soda
  • 1-2 jalapeños, seeds removed and finely chopped
  • 1/2 cup shredded cheddar cheese

Method

  1. Pre-heat oven to 450°F. In a mixing bowl, add the flour, baking powder, baking soda, salt, jalapeño, and cheddar.  Mix everything together and try to distribute the cheese and jalapeño as evenly as possible.  Cut the butter into small pieces (I actually like to use a cheese grater and grate the butter in) and combine into the flour mixture until it resembles course meal.
  2. Add in the buttermilk and mix until everything is combined.  you can use a spoon but it’s easiest to just use your hands.  Dump the dough onto a lightly floured surface and press it down using your hands until it is about 1/2″ thick.  Fold the dough and flatten out again.  Repeat this 4 times and finish with it at about 3/4″ thick.
  3. Using a cookie cutter or glass (about 2 1/2″) cut out the biscuits.  I usually get 6-7 out of the first round of cuts, and then use the extra pieces to get another 2-3 biscuits.  Be careful not to twist as you cut them out, go straight down.
  4. Place the biscuits on a parchment paper lined baking sheet and cook for 12-15 minutes or until lightly golden brown on top.

Buttermilk Biscuits

post

Fried Chicken Eggs Benedict

Fried Chicken Eggs Benedict 

Making Hollandaise sauce can be intimidating, but with this shortcut blender method, anyone can do it.  This will definitely take your brunch game to the next level!

Ingredients 

  • 2 chicken breasts, pounded to even thickness and cut in half
  • 1 cup buttermilk
  • 1 cup flour
  • 1/4 tsp cayenne
  • 1/4 tsp salt
  • 2-3 dashes Frank’s hot sauce
  • 2 English muffins
  • 4 eggs + 3 yolks
  • 1/2 cup (1 stick) butter
  • 1 tbsp lemon juice
  • Canola oil, for frying
  • Salt + Pepper

Method

  1. In a bowl or ziplock bag, combine the chicken, buttermilk, and hot sauce.  Allow to marinate in the fridge for at least 2 hours, ideally overnight.
  2. Heat oil to 350°F.
  3. Combine the flour, salt, and cayenne cayenne in a bowl for the dredge.  Remove chicken from buttermilk, allowing excess to drip off and coat in the flour dredge.
  4. Fry the chicken for 8-10 minutes until fully cooked through and golden brown.  While the chicken is cooking, add the vinegar and a pinch of salt to a large pot of simmering water and poach the eggs for 3 and a half minutes.
  5. To make the hollandaise, add 3 egg yolks and lemon juice to a blender.  Pulse to combine. Melt butter in small saucepan.  Set blender to low and slowly add melted butter while it is running.  Continue to blend until sauce is thick and frothy.  Season with salt and pepper.
  6. To build, slice and toast the english muffins and lightly butter.  Place one piece of fried chicken on each half and top with a poached egg.  Drizzle with hollandaise right before serving
post

Nutella and PB&J Stuffed Donuts

Donuts may seem difficult to make but this recipe is so simple and requires no special equipment, anyone can do it.  They are perfect to make at home on a lazy Sunday. Enjoy!

Nutella and PB&J Stuffed Donuts

Ingredients

  • 2.5 cups all-purpose flour
  • 2/3 cup whole milk
  • ½ cup sugar, divided
  • 2 egg yolks
  • 3.5 Tbsp butter, unsalted
  • 1 packet active dry yeast
  • 1 heaped tbsp ground cinnamon
  • Pinch of salt
  • powdered sugar, for dusting
  • Canola oil, for frying
  • Nutella, Peanut butter, and Jam, for filling

Method

  1. Add the milk and half the sugar to a pan and heat to about 110°F. Allow the sugar to dissolve then add yeast to a bowl and pour about half of the warmed milk over the yeast. Put the remaining milk back on the stove over a low heat and add butter.
  2. Add the flour and salt to a large mixing bowl creating a well in the center. Add the yolks and all the milk.  Using a wooden spoon or spatula, fold in the surrounding flour until a dough forms.
  3. Place the dough on a lightly floured surface and knead until it is smooth and elastic, dusting with flour when necessary. Place the dough into a large bowl that his been lightly greased.  Cover and allow to rise in a warm place for an hour or until approximately doubled in size.
  4. When the dough has risen, punch it down on a floured work surface and roll out into a sheet about ¾’’ thick. Cut circles out using a 3” cookie cutter.  Re-roll out excess dough and repeat.  Place cut donuts onto parchment paper and allow to rise for another 30 minutes, covered.
  5. Combine remaining sugar with cinnamon in a wide bowl
  6. Heat oil to 340°F and fry donuts in batches for 1½ – 2 minutes per side until golden brown. Toss in cinnamon sugar while still hot.
  7. To fill donuts, use a pastry bag fitted with a plain nozzle and squeeze Nutella into some, and PB&J into others. Fill just until it starts to ooze out. Dust with powdered sugar and  Serve immediately.

*These can also be made without filling them and they are still delicious

post

Blueberry Buttermilk Pancakes

Buttermilk Pancakes

Incase you couldn’t tell, I like breakfast foods a lot, and these buttermilk pancakes are no exception.  They are quick and easy to make, and can be really impressive when they are all dressed up.   Serve them with fresh fruit and maple syrup for an amazing brunch or breakfast.  Feel free to customize the recipe by adding chocolate chips, chopped nuts, or your favorite berries to the batter for an extra burst of flavor and texture.  Recipe below!

Ingredients

  • 2 cups all purpose flour
  • 2 cups buttermilk
  • 2 tbsp sugar
  • 2 large eggs
  • 5 tbsp unsalted butter, melted2 tsp baking powder
  • 1 tsp baking soda
  • ½ tsp salt

Method

  1. Combine flour, sugar, baking powder, baking soda, and salt in a large mixing bowl
  2. Combine beaten eggs, buttermilk, and melted butter in a separate bowl
  3. Form a well in the center of the dry ingredients and slowly pour in the wet mixture. Stir just until combined trying not to over mix.
  4. Ladle about ½ cup of batter onto a med-high heat pan that has been lightly greased with vegetable oil
  5. Flip the pancake when bubbles start to form on the surface, this should take couple of minutes
  6. Keep the pancakes warm in a 250 degree oven until ready to serve

Pictured with my pancakes is a blueberry compote that is super simple to make. Read how below.

 Blueberry Compote

Ingredients

  • 2 cups frozen blueberries
  • 1 tbsp brown sugar
  • 3 tbsp water
  • 1 tsp lemon juice

Method

  1. Combine all ingredients in a small saucepan over med-high heat
  2. When the mixture comes to a boil, reduce heat to low and simmer
    for about 10 minutes
  3. If the mixture becomes too thick, add a bit more water to thin it
    out
  4. Serve warm on top of pancakes (any leftover can be refrigerated
    for several days)
post

Buttermilk Waffles

Buttermilk Waffles

Waking up is easy with these delicious and fluffy buttermilk waffles.  You can have these ready in less than 30 minutes start to finish.  You can even prepare the batter the night before and keep it in the fridge for a real no fuss breakfast.  These waffles are great on their own with some maple syrup or you can dress them up with fresh berries, Nutella, bananas, or whatever your hungry heart desires.  Check out the recipe below!

Ingredients

  • 2 cups buttermilk
  • ½ cup unsalted butter, melted (1 stick)
  • 2 cups all-purpose flour
  • ¼ cup brown sugar (can use regular if you want)
  • 2 tsp baking powder
  • 1 tsp soda
  • 1 tsp ground cinnamon
  • ½ tsp salt
  • 2 tsp vanilla extract
  • 2 eggs, beaten

Method

  1. Combine buttermilk, melted butter, beaten eggs, and vanilla in a mixing bowl
  2. In a separate bowl, combine flour, sugar, baking powder, baking soda, cinnamon, and salt
  3. Form a well in the center of the dry ingredients and slowly pour in the wet ingredients until a smooth batter forms
  4. Heat waffle iron and spray with non-stick cooking spray
  5. Pour in about 1/3 cup of batter depending on the size of your waffle maker and cook until done; this should only take a couple of minutes
  6. You can preheat your oven to 250 degrees to keep the waffles warm as they come out

I like my waffles with caramelized banana.  Check out how to make them below: 

Caramelized Bananas

 Ingredients

  • 2 ripe bananas, sliced
  • 2 tbsp unsalted butter
  • 2 tbsp brown suger
  • Bourbon (optional)

Method

  1. Melt butter in pan on med-high heat
  2. Add sliced bananas along with the brown sugar and give the pan a good toss
  3. If you want to, add a splash or two of your favorite bourbon (This step is completely optional)
  4. Continue to cook for about 5 minutes until the bananas soften and it starts to get slightly syrupy